

Materials Needed: W.W. Banana Cream, Aran, Baby Pink (used sport, but WW will work), and Lavender Yarn (use whatever colors you wish) / 10 mm Black Onyx Eyes / Pink Embroidery Thread / White Sewing Thread / White Felt / Tapestry Needle / Sewing Needle / Pins / Stitch Marker / White Pipe Cleaners / F Hook
Abbreviations Used: BEG (beginning), CH (chain), SC (single crochet), ST (stitch), SC2TOG (decrease by two stitches), SC3TOG (decrease by three stitches), MC (magic circle/magic adjustable ring), SLPST (Slipstich)
Head:
Round 1: 6SC
in MCRound 2: 2SC in each ST around. (12)
Round 3: SC1, 2SC in next ST around. (18)
Round 4: SC2, 2SC in next ST around. (24)
Round 5: SC3, 2SC in next ST around. (30)
Round 6: SC4, 2SC in next ST around. (36)
Round 7-9: SC in every ST around. (36)
Round 10: SC4, SC2TOG. (30)
Round 11: SC3, SC2TOG. (24)
Round 12: SC2, SC2TOG. (18)
Round 13: SC1, SC2TOG. (12) At this point you should probably snap the eyes in and embroider your mouth and begin stuffing the head.
Round 14: SC2TOG around. (6) Fasten off and leave a tail to sew head on later.
Body:
Round 1: 10SC in MC.
Round 2: 2SC in each ST around. (20)
Round 3: SC1, 2SC in next ST around. (30)
Round 4 – 6: SC in each ST around. (30)
Round 7: SC3, SC2TOG in next ST. (24)
Round 8 – 10: SC around. (24)
Round 11: SC3,SC2TOG (which leaves one stitch left, just SC in it). (20)
Round 12 – 14: SC around. (20)
Round 15: SC2, SC2TOG. (15)
Round 16 – 18: SC in each ST around. (15)
Round 19: SC1, SC2TOG around. (10)
Round 20: SC3TOG, SC in next 4ST, SC3TOG. (6) Fasten off and hide end in the body. Stuff body.
SEW HEAD TO BODY
Arms (make two):Round 1: 6SC in MC.
Round 2: SC2, 1SC in next ST around. (9)
Round 3-4: SC around. (9) Stuff the hand.
Round 5: SC1, SC2TOG around. (6)
Round 6-13: SC around. (6) Fasten off and leave a tail. Take a white pipe cleaner and cut it to fit in the arm only. Do not cut it to fit the length of the arm and hand. Bend the ends of the pipe cleaner up and twist, so they do not poke through the yarn. Put in each arm.
Legs (make two):
Round 1: 6SC in MC.
Round 2: 2SC in each ST around. (12)
Round 3: SC1, 2SC in next ST around. (18)
Round 4 - 7: SC around. (18)
Round 8: SC1, SC2TOG. (12)
Round 9 -12: SC around. (12)
Round 13: SC1, SC2TOG. (8)
Round 14 - 22: SC around. (8)
Elvin Ears: DO NOT TURN!
Row 1: 6SC in MC, CH1, turn.
Row 2: SC across, CH1, turn.
Row 3: Sc across, add an extra ST at end, SC in ST of previous row, and back down the wrong side of the work, up the side of the rows and join to the 1st SC of Row 3 with a SLPST. Fasten off and leave a tail for weaving in.
SEW ARMS, LIMBS, AND EARS TO BODY

Shirt:
Front and Back (make two):
Row 1: CH7, SC in 2nd CH from hook and across. (6)
Row 2: SC across, CH1, turn. (6)
Row 3: SC2TOG, SC in next 2ST, SC2TOG, CH1, turn. (4)
Row 4 – 7: SC across, CH1, turn. (4)
Row 8: SC across, adding an extra ST at end, SC down the side and around, SLPST to BEG ST of Row 8. Pin the front and back pieces to the body of the doll. Taking a long piece of baby pink yarn, lace up the sides of the front and back pieces (much like you would with a shoe). Tie a bow at the end and cut off excess yarn.
Dress:
Row 1: CH30,
SC in 2nd CH from hook and across, CH1, turn.Row 2-3: SC across, ch1, turn. Fold in half, and SLPST the piece shut. Fasten off and hide ends. Add fringe around the rim of the dress.
Hair Instructions:
Using hair color.
Round 1: 6SC in MC
Round 2: 2SC in each ST around. (12)
Round 3: SC1, 2SC in next ST around. (18)
Round 4: SC2, 2SC in next ST around. (24)
Round 5: SC3, 2SC in next ST around. (30)
Round 6: SC4, 2SC in next ST around. (36)
Round 7-10: SC in every ST around. (36) FO. Leave a long tail for sewing on.
- Sew the hair cap to the head.
- Cut 12-14" strands of hair yarn (or however long you want it) and attach to head like you would attach fringe to a scarf.
- See video reference below for how I attached my hair.
WINGS:
-
Print out the pattern
for the wings. Image is below.
-
Cut wing shape out of
paper.
-
Pin to felt.
-
Cut out felt wing.
(MAKE FOUR TOTAL)
-
Sew along edges,
leaving a big enough hole to turn inside out.
-
Turn inside out.
-
Stuff.
-
Sew up hole.
- Sew to back of doll as seen in picture below.
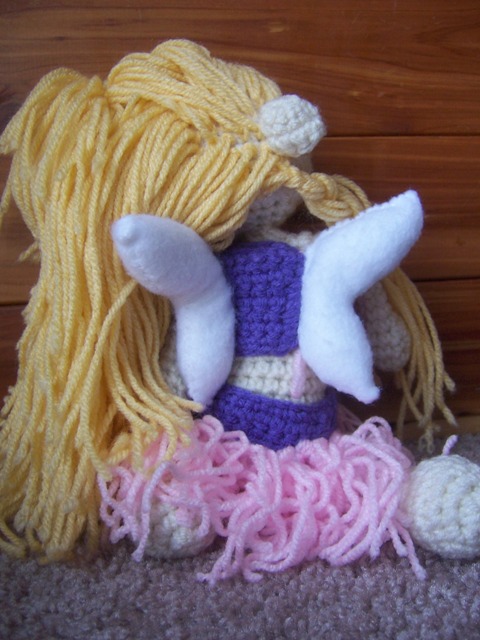
WING PATTERN:
 |
| Click to open up in a new window and print it out.
Note: If for some reason this does print out really small or large, please adjust your printer settings to print “original size”.
UPDATED: 5/28/2015
|
Such a sweet Fairy Doll! Thank you.
ReplyDeleteReally cute, cute, cute, Pretty little fairy.
ReplyDeleteThis fairy doll is so sweet.I'm going to have a go at making her for myself xx
ReplyDeleteLet me see pictures of the finished doll! :)
DeleteLoved the doll so much. I made one up for myself. thank you for a lovely pattern. the only difference I did was to crochet her wings.
ReplyDeleteYour welcome! Thanks for the compliments.
Deletehere's a link to a picture of mine. http://www.flickr.com/photos/90790423@N04/8358852114/in/photostream
DeleteI LOVE HER! :)
DeleteI adapted your pattern and made a little girl and working on a boy for a brother sister duo. I uploaded her to my Flickr page. if you wanna check her out. thank you again for such a cool pattern everyone that sees my little fairy loves her. :)
DeleteOMG. She's so freaking cute! :)
DeleteThank you. :) ... Last time I bother ya. my little boy is done. he's uploaded to Flickr now.
DeleteI love the pattern. Any little girl would love to have one. So would I!
ReplyDelete