
 |
| Updated: 01/28/2011 |
- G Hook
- WW Red, Brown, Turqua
- Googly Eyes or doll eyes
- Tapestry Needle
Head:
R1: 6SC in MC.
R2: 2SC in each ST around. (12)
R3: SC1, 2SC in next ST. (18)
R4-8: SC around. (18)
R2: 2SC in each ST around. (12)
R3: SC1, 2SC in next ST. (18)
R4-8: SC around. (18)
R9: Change to teal yarn (for collar - not visible in pic), in BLO SC around. (18)
Nostrils (make two):
Nostrils (make two):
R1: 6SC in MC.
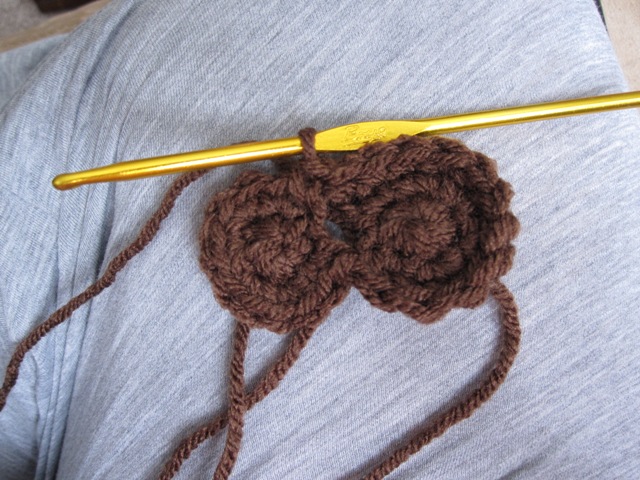
R2: 2SC in each ST around. Bind off.-Make a second nostril but do NOT bind it off! Hold both nostrils together and SC around the top two times. (48 total SC for two rounds = 24sc per round). Pictures below.
R3: Do only one SC1 and SC2TOG. (15) -Stuff with polyfiber fill to help keep shape.
Tongue:
R1: CH4, SC in 2nd CH from hook and across, CH1 and turn.
R2: SC across, CH1 and turn.
R3: Repeat row 2.
R4: SC2TOG, SC1.
Mouth Flap (goes under nostrils):
R1: 6SC in MC. CH1, turn.
R2: SC across, CH, turn.
R3: SC across, CH1, turn.
R4: Repeat row 3. Bind off.
Body:
R1: 6SC in MC.
R2: 2SC in each ST around. (12)
R3: SC1, 2SC in next ST around. (18)
R4: SC2, 2SC in next ST around. (24)
R5: SC3, 2SC in next ST around. (30)
R6: SC4, 2SC in next ST around. (36)
R7: SC around.
R8: SC4, SC2TOG. (30)
R9: SC around. (30)
R10: SC3, SC2TOG. (24)
R11-16: SC around. (24)
R17: SC2, SC2TOG around. (18)
R18: SC3, SCTOG around. (12)
R18: SC3, SCTOG around. (12)
R19-22: SC around. (12)
R23: SC1, SC2TOG. (6) Bind off and close up hole.
Arms and Legs (Make 4):
R1: 6SC in MC.
R2: 2SC in first 3ST, SC in next 3ST. (9)
R3: 2SC in first 3ST, SC in remaining. (12)
R4: SC2TOG (3x), SC in remaining ST. (9)
R5: SC2TOG (2x), SC in remaining ST. (7)
R6-17: SC around. (7) Bind off and leave a tail for sewing.
Tail:
R1: 6SC in MC.
R2-20: SC around. (6)
Ears (Make Two):
R1: CH3, SC in 2nd CH from hook, CH1 and turn. (1)
R2: SC2, CH1 and turn. (2)
R3: 2SC in each ST, CH1 and turn. (4)
R4: 2SC in 1st ST, SC in next 2ST, 2SC in last ST, CH1 and turn. (6)
R5: 2SC in 1stST, SC4, 2SC in last ST. (8)
Assembly:
Note: Use straight pins to line up your body parts!
- Sew nostrils on head, sew tongue underneath, sew mouth flap under tongue.
- Sew ears ontop of head.
- If you haven't already, stuff the head and body.
- Sew head onto the body.
- Sew arms and legs onto body.
- Sew on tail.
- Hide all ends!
 |
| Holding Nostrils Together |
 |
| SC in adjoining ST on other nostril. |
 |
| How to hold mouth while sewing. |
 |
| Sewing on mouth flap. |
Updated: 2/21/2018 - Added materials and hook size list.
Hi! Couple quick questions :)
ReplyDeleteFor the head, why change to a different color yarn for R9?
With the nose, when holding the two nostrils together, exactly how do you hold them together? One on top of the other, or side by side? I held them like I was making the top of a 3D heart. And when you say sc around the TOP two times...around both the nostrils twice? Going around them once is 24, twice would be 48 sts. That's as far as I got on the pattern, so no more questions yet. lol
In R9 you change to teal yarn to make the collar on the dog, which can't be seen in the picture. If you don't want a collar, then I would just not bother changing colors.
ReplyDeleteYes, you hold the two nostril pieces together, side by side with the opening up, so you can crochet around the rim to connect them into one object.
Good point about the stitches changing to 48 not 24. Did not think about that and will update immediately.
Let me know if this helps ok? You can e-mail me privately if you like (ivory142@gmail.com).
Thank you for fixing the pattern! So far, I have all the pieces crocheted and didn't have any problems. Now I just need to know how to put it together. The legs, tail and ears are easy, but I'm not quite sure how to put the face together and attach the head to the bottom, seeing as how the head has an open bottom...
ReplyDeleteAlso, I'm looking at what I have for the nose and what you have, and yours looks like it has more rows than what's in the direction. And mine is misshapen. lol And I simply cannot figure out how to attach it to the head.
ReplyDeleteI came to the realization that I completely forgot the assembley instructions (that is what I get for not having pattern testers for this one).
ReplyDeleteI will add those instructions to the pattern.
And for the nose, it should look like two round balls stuck together. You will need to add some stuffing in the nose so it can keep it's shape. As for the extra rows, did you count how many on your nose as opposed to how many rows on the pattern?
I've done that before where I just added an extra row b/c I lost count or whatever (toddlers are distractions).
I think you may have one more row than I do, I'm not sure. I'm going to try making another nose to see how it comes out. Do you happen to have any more pictures of your Great Dane? Maybe a side view? That way I can see how to attach the nose to the head, etc etc. Thanks!
ReplyDeleteNo, I don't have a picture (had a bad camera at the time and he was sent in a swap), but I can crochet the head and nose.. it should take me like five minutes to do.. I will post the picture here.
ReplyDeleteAwesome, you are wonderful! Thank you!
ReplyDeleteGlad I was able to help you out! :)
ReplyDeleteHi again!
ReplyDeleteI'm making the dog again. :) I meant to ask about this last time but I forgot. For the body, in R17 you decrease to 18. Then R18-21: SC around. (12). Yet, you never decreased to 12. I can't remember how I did the body last time, but I can't for the life of me get it right again.
It's obviously a typo, I will fix it.. there should be a row of decreases there.
ReplyDeleteThanks again! :)
ReplyDeleteI'm having trouble with the the dog's head. The pictures showing how to attach the nostrils and mouth show attaching in the center of the head. The picture of the completed dog looks like there is a lot more head above the nostrils and mouth. Should I just play with the head piece (adding rows) until it looks correct to me?
ReplyDeleteOh my I feel so rude. I published your comment and forgot to respond. I AM SO SORRY!
ReplyDeleteI think why the new picture looks different is b/c I overstuffed the nose. I used yarn scraps and should have just parted with the fiber fill lol.
Feel free to play with it. If you've already made the head piece, make the nostrils and see how they line up on the head (are they to big or do they just look ok).
You could also use a size smaller hook to make for a smaller nose.
Again, really sorry for lack of response. I feel bad.
Awesome pattern! Thanks for sharing. Going to make this for my granddaughter. Love your blog!!!
ReplyDeleteHook size pls, amount of and what ply of yarn?
ReplyDeleteUpdated the pattern with the information you requested. As far as the amount of yarn, it wont take more then a skein. I use either RH or Hobby Lobby brown, both are in the neighborhood of 300 yards. You could probably make more than one of these dolls with that.
Deletehi i was wondering how big is the finished size?
ReplyDeleteThis comment has been removed by the author.
DeleteI think that it was around 12-16" depending on what yarn and hook you use it could vary.
Delete